One of the biggest opportunity provided by the rise of decentralized finance (DeFi) is yield farming.
Yield farming is essentially committing your cryptocurrency into a central pool in exchange for a yield. The pool is commonly known as a liquidity pool. The amount of cryptocurrency you put into the pool earns you liquidity pool token, which represents your % holding of the whole pool.
This pool becomes a “marketplace” where users can exchange, borrow or trade cryptocurrency for. As each transaction in the pool earns a transaction fee, this transaction fee is returned to the liquidity pool and this is where you get your yield or interest from.
The interest and yield is distributed to liquidity providers based on their ownership of the pool, determined via the liquidity pool token.

Yield farming is very attractive to cryptocurrency owners because this provides a way for you to earn passive income on your idle cryptocurrencies. For relatively new currencies with limited liquidity, the yield can be as high as 4 or 5 figures annual percentage yield.
How to start farming
Here are the step by step summary:
- Identify farms (Pancakeswap)
- Identify the blockchain the farm is operating on (Binance Smart Chain)
- Configure your Metamask to connect to the correct blockchain (Binance Smart Chain)
- Connect your farm to the Metamask and you should see your wallet address instead of the “Connect” button
- Choose the currency pair you want to farm (KUN-QSD). The lower the liquidity in the pool, the higher the APY
- Make sure you have money in your Metamask wallet (eg. $1000)
- Go to “Swap” to change your money into the 2 identified cryptocurrency pair in a 1:1 ratio ($500 worth of KUN and $500 worth of QSD)
- Select “Add Liquidity” and choose the KUN and QSD pair.
- Provide liquidity by supplying both KUN and QSD into the liquidity pool and you will receive your Liquidity Pool Token (LP).
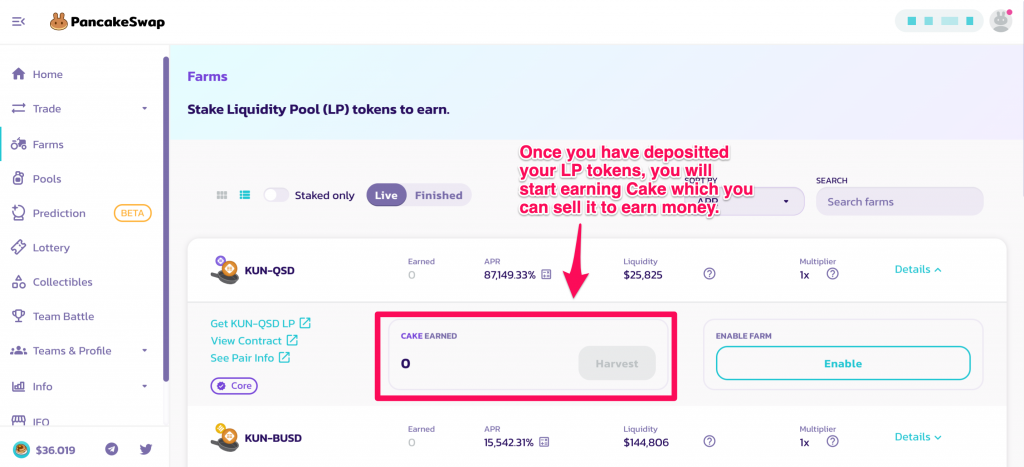
- Go to “Farm” and deposit your KUN-QSD LP token into the KUN-QSD farm and you can start earning your interest in Cake.
- Cash out your Cake by clicking “Harvest” and you will find your earned Cake in your Metamask wallet.
Detailed Explaination
To start farming, you will need to connect a wallet with cryptocurrency to the farm that you want to farm.
The most common and widely used wallet is Metamask. Anyone can easily register and sign up for a Metamask digital wallet – which essentially contains a wallet address to store all your cryptocurrencies.
For the purpose of illustration, we will be using Pancakeswap, the most popular yield farm on the Binance Smart Chain. There are hundreds of farms across the different blockchains and you will have to configure your wallet to connect to the right blockchain and its respective yield farms.
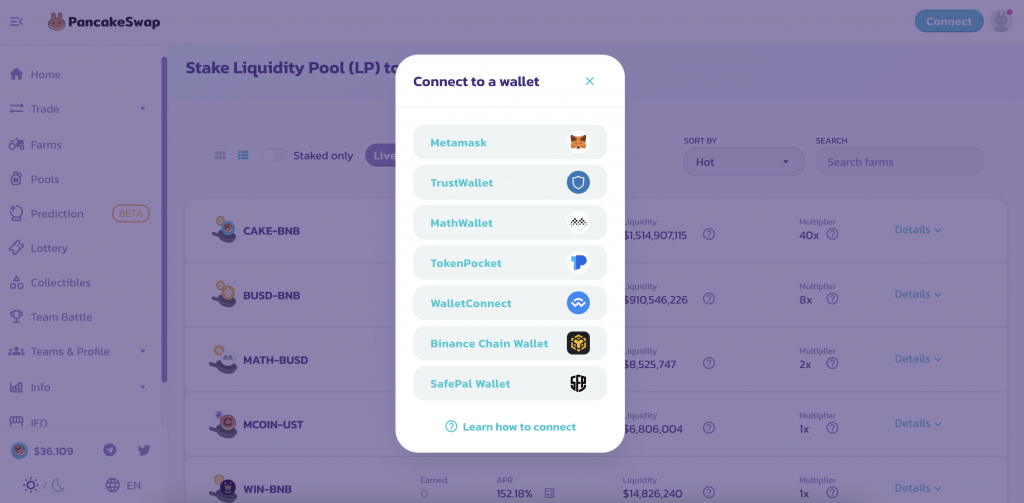
When you visit any yield farm, the first thing you will see is a “Connect” button on the top right corner.
You wont be able to do anything until you connect your wallet to the yield farm. By default without any configuration, your new metamask wallet is on the Main Ethereum Network, with is incompatible with Pancakeswap.
To connect to Pancakeswap, you need to configure your wallet to the Binance Smart Chain. This is because Pancakeswap is built on the Binance Smart Chain and can only “read” and work with cryptocurrency on the Binance Smart Chain.
Configuring Metamask to connect to Binance Smart Chain
To connect to the Binance Smart Chain, if you are using Metamask, the default network which Metamask is operate on is the Main Ethereum Network.
If you try to connect Pancakeswap with your Metamask (on the Main Ethereum Network), you wont be able to do it. This is because Pancakeswap can only connect with wallets on the Binance Smart Chain.
In order to fix that, you simply have to configure your Metamask to the Binance Smart Chain.
Step 1: Open Settings.
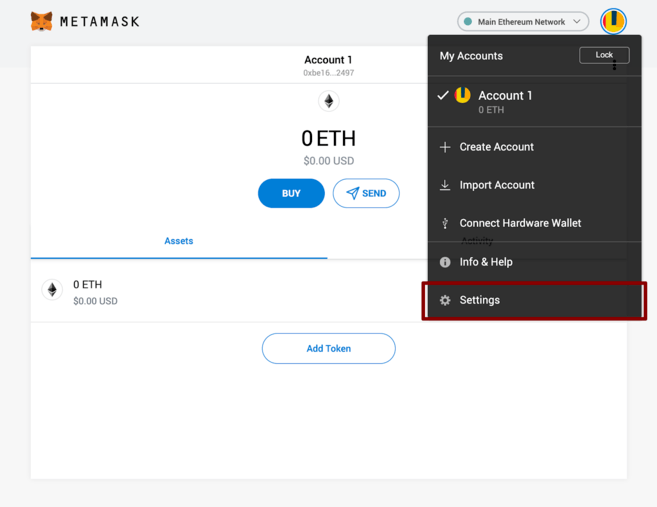
Step 2: Under Networks, Add New Network.
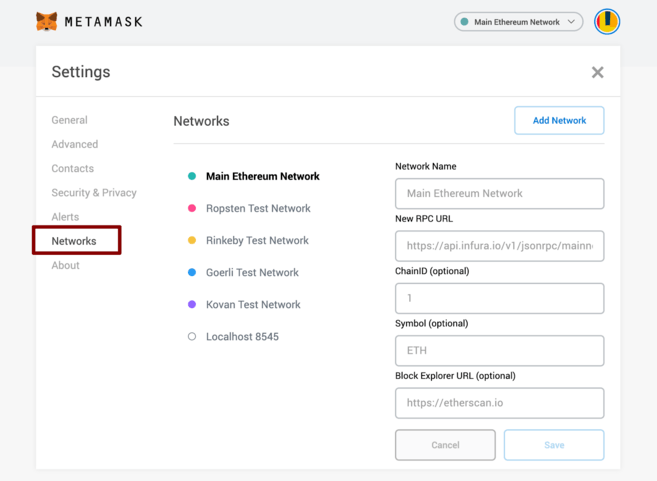
Step 3: Enter the Binance Smart Chain Address as shown below:
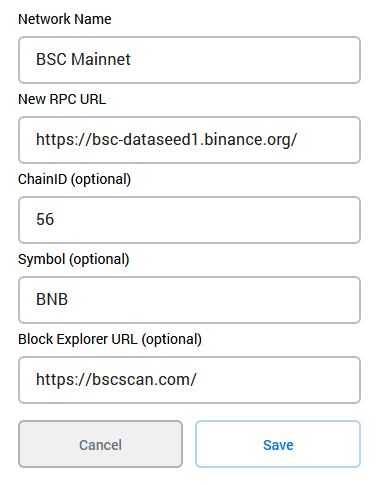
Step 4: Add Binance Smart Chain. You should be now be connected to the Binance Smart Chain.
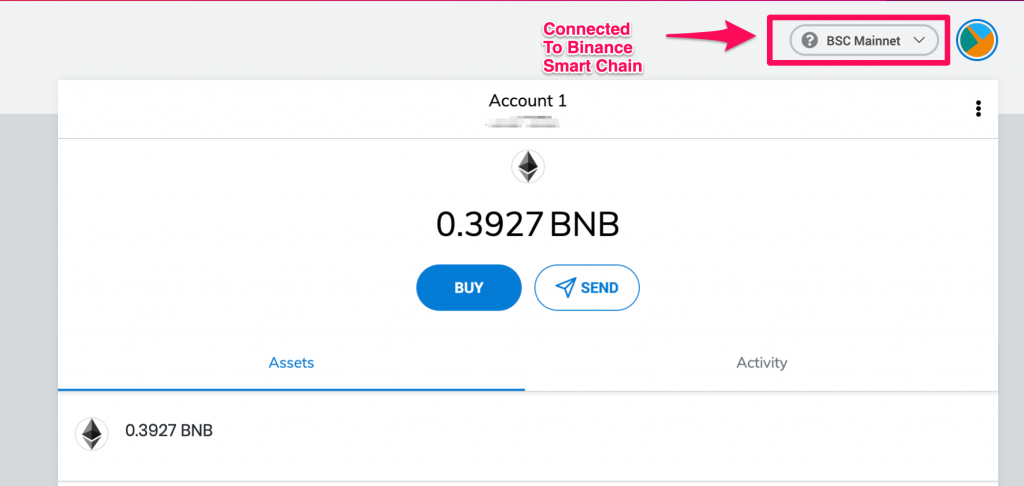
Once you are connected to the Binance Smart Chain, you can return to the Pancakeswap webpage. You can now connect your Metamask to the Pancakeswap page.
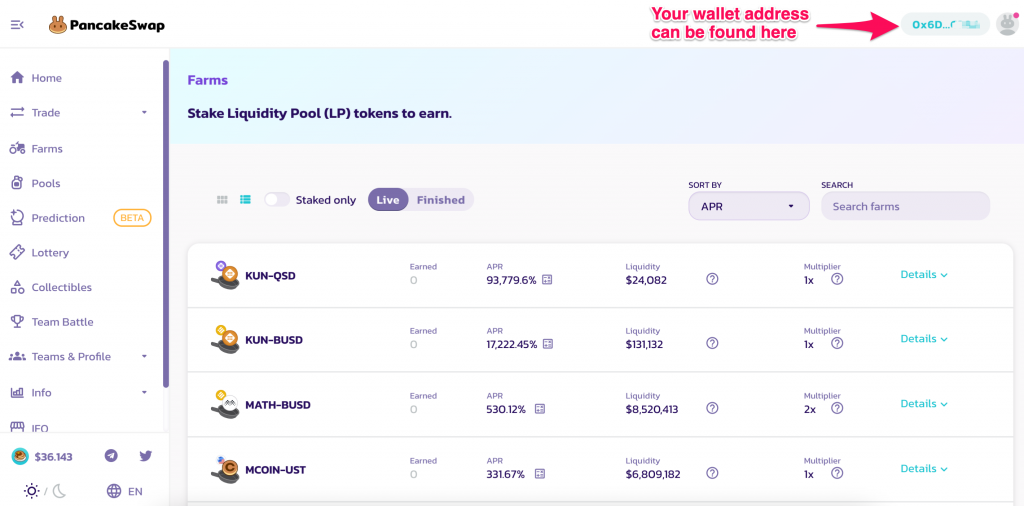
Once your wallet is connected, you will be able to see your wallet address on the top right corner instead of the “Connect” button.
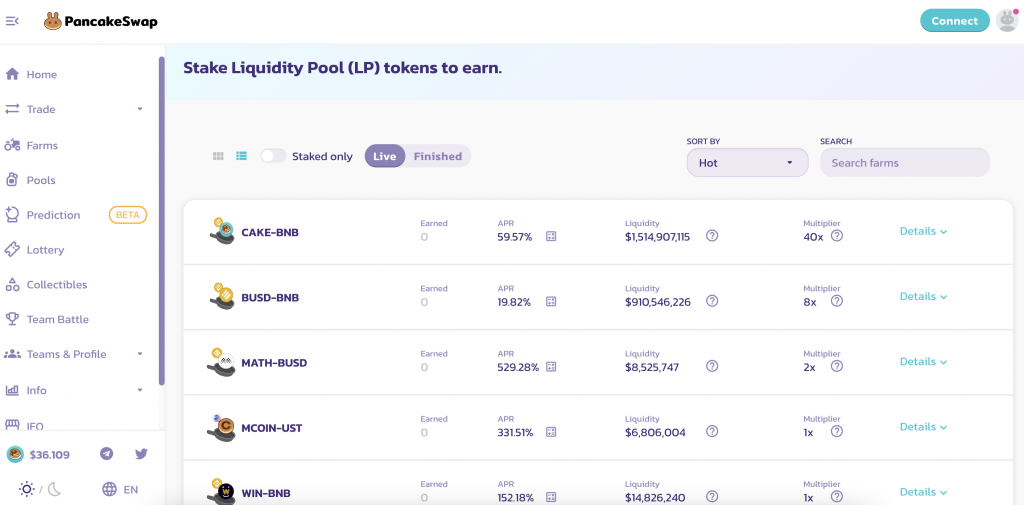
With your wallet connected, you can now choose which pool you want to provide liquidity and farm the liquidity pool token.
In the above image for example, if you provide Kun-QSD liquidity into the liquidity pool, you will be earning an APR of 93,779%. The high APY is because of the low liquidity and hence as a liquidity provider, you will be entitled to a higher share of the liquidity pool rewards, and hence translated to a high APY.
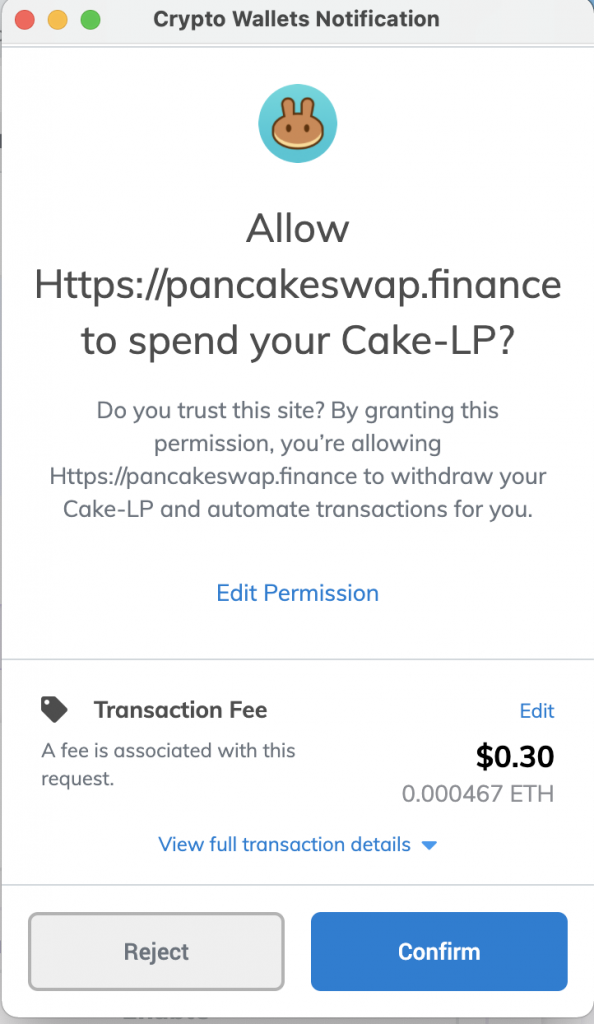
To provide liquidity into the KUN-QSD liquidity pool, simply click on it and enable the farm.
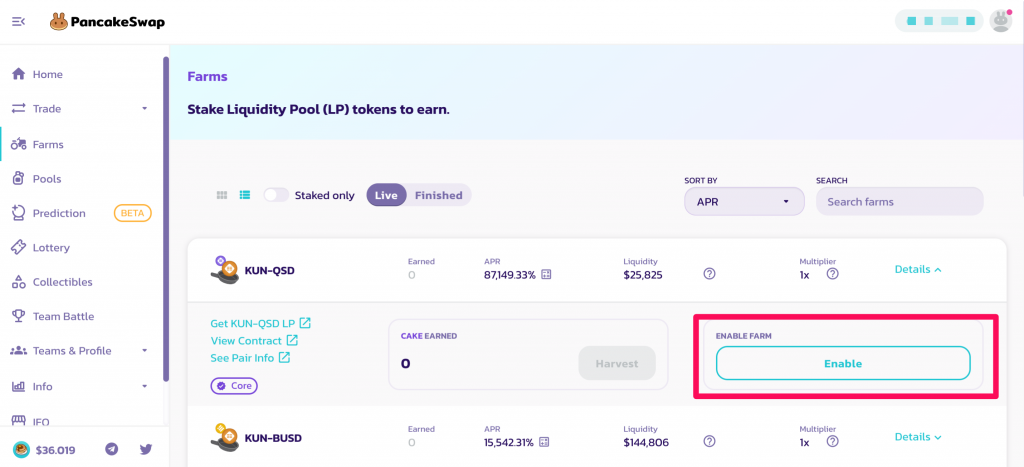
You will receive a pop up asking for your permission to “open up the farm” at a fee. Each action you perform is recorded on the blockchain, which is verified by other users. Hence each transactions cost a small fee.
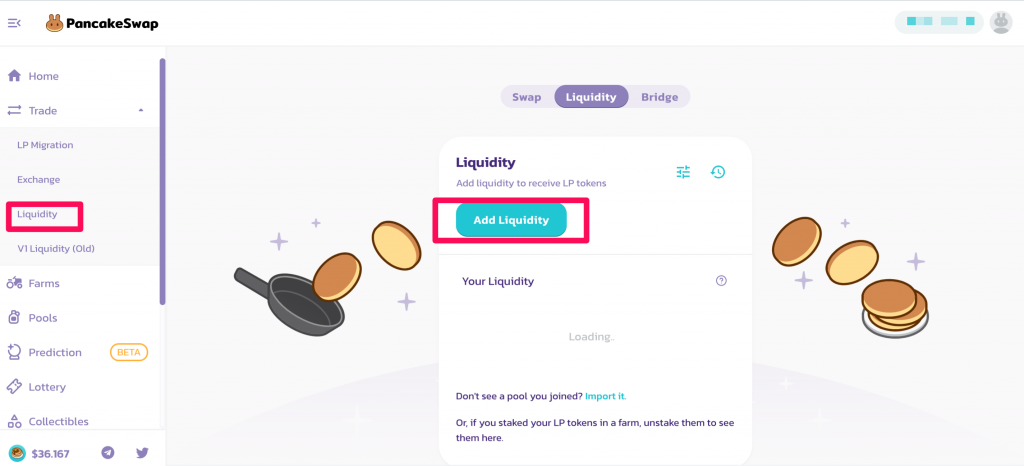
Once you have enabled the farm, to start farming, you will need to provide liquidity into the pool. You will need to go to “Liquidity” to prepare the equal amount of the cryptocurrency pair you want to farm.
For this example, if you are looking to farm $1,000, you will need $500 worth of KUN and $500 worth of QSD. You can get these from the Pancakeswap exchange where you simply swap over any coins in your wallet to the respective currency.
After you have managed to prepare $500 worth of KUN and $500 of QSD, you can go to liquidity and add the liquidity to the pool.
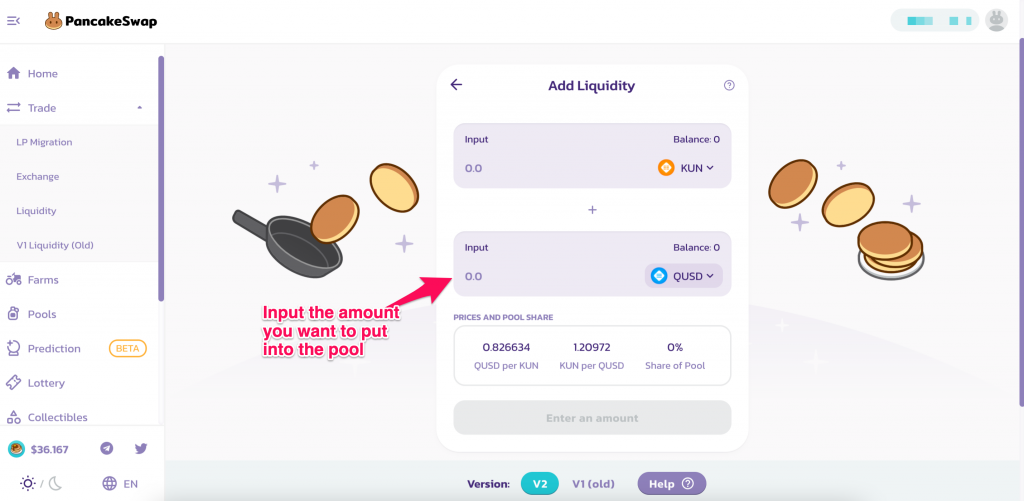
Once you are done, you will receive a notification that you have earn a certain amount of Liquidity Pool token, which shows that you have successfully pooled your money into the liquidity pool.
With these liquidity pool token, you can now use it to farm for rewards.
Remember, the liquidity pool token only represents your “stake” in the pool and it doesnt earn you anythinng until you “farm” it.
To farm your liquidity pool token, return to the farm page, and you will be able to supply these liquidity pool token to earn the rewards.
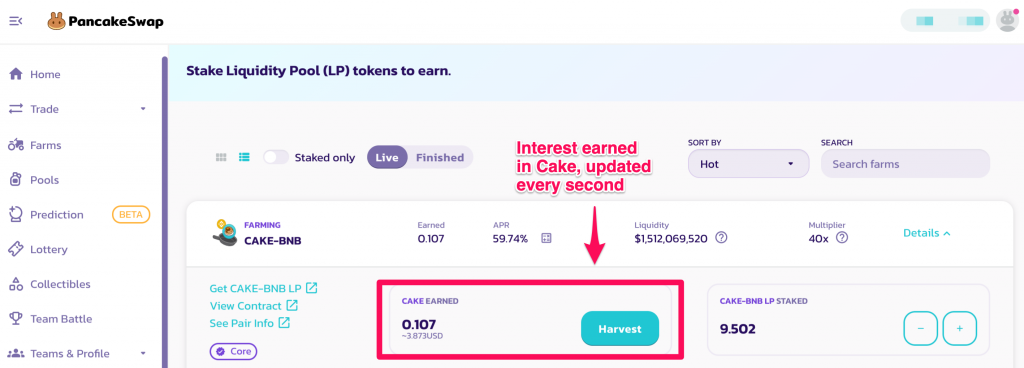
If you have successfully staked your liquidity token, you will be able to see your yield reflected and updated every second. You can choose to “harvest” or cash out these rewards onto your wallet.
Here are the step by step again:
- Identify farms (Pancakeswap)
- Identify the blockchain the farm is operating on (Binance Smart Chain)
- Configure your Metamask to connect to the correct blockchain (Binance Smart Chain)
- Connect your farm to the Metamask and you should see your wallet address instead of the “Connect” button
- Choose the currency pair you want to farm (KUN-QSD). The lower the liquidity in the pool, the higher the APY
- Make sure you have money in your Metamask wallet (eg. $1000)
- Go to “Swap” to change your money into the 2 identified cryptocurrency pair in a 1:1 ratio ($500 worth of KUN and $500 worth of QSD)
- Select “Add Liquidity” and choose the KUN and QSD pair.
- Provide liquidity by supplying both KUN and QSD into the liquidity pool and you will receive your Liquidity Pool Token (LP).
- Go to “Farm” and deposit your KUN-QSD LP token into the KUN-QSD farm and you can start earning your interest in Cake.
- Cash out your Cake by clicking “Harvest” and you will find your earned Cake in your Metamask wallet.
Have fun farming!
If you are a new Binance user, you can register using our referral link and get 5% off your trading fees.
Also Read: How To Deposit SGD From Your DBS or POSB Singapore To Binance
Featured Image Credit: Swissborg