The world of decentralized finance (DeFi) provides for limitless opportunities on-chain.
But there’s just one issue. How do you get your funds over? Today, we will resolve this once and for all.
This article will focus on using Gemini as the main centralized exchange (CEX) from which we will transfer tokens to Metamask, the most popular hot wallet. Some other exchanges that I personally use, and are mentioned in this article, include Kucoin and Crypto.com.
How to fund Gemini
To start off, we need to send funds (fiat currency such as SGD or USD) over from our bank account to a CEX.
In this article, we use Gemini because of the 10 free withdrawals/month which will come in handy later.
However, it is possible to send funds directly to other exchanges such as Crypto.com and FTX as well. There are 2 ways in which you can deposit funds into Gemini.
- Send SGD to Gemini via a FAST transfer. You should receive the deposit in a matter of hours. Buy BTC or ETH with SGD and then sell for USD. Now, you are free to buy any other coins on Gemini.
- Send USD to Gemini via DBS Remit (how I personally do it). Take note while there are no transfer fees, there is a spread (around 0.75% based on the last time I calculated). Deposits normally arrive at the end of the day, before midnight, since it is cleared by an American bank.
Once your funds are in Gemini you can begin buying your favorite tokens to bridge to Metamask. But before that, we have to ensure that we have the relevant network added on Mmtamask.
You see, Metamask only comes inbuilt with the Ethereum network. This means to say that if you wanted to bridge to the Polygon network, you would have to add the network.
Adding custom RPC
Take Polygon as an example. You can find the details here. This link provides the details for the BSC and Avalanche mainnet as well.
These are the details you would need to enter on MetaMask to set up the mainnet. Follow the screenshots below for a step-by-step guide:
Here are the network details for Harmony and Fantom.
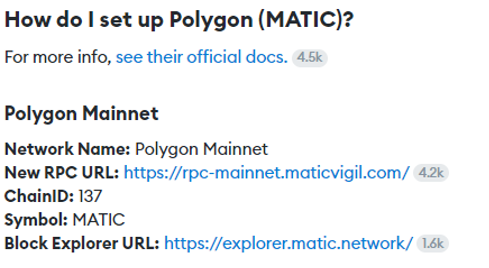

Use the details in the first screenshot and paste them accordingly in Step 3. Once you have successfully added the Polygon network, you should see it on your MetaMask wallet when you click the dropdown box.
You can do the same for other networks with the details I have linked above.
On-ramp process
Now comes the important part where we finally move the tokens from Gemini onto Metamask. For starters, moving ETH is the most straightforward.
You can simply withdraw ETH or any ERC20 tokens from Gemini by pasting your MetaMask address in the Gemini withdrawal tab.
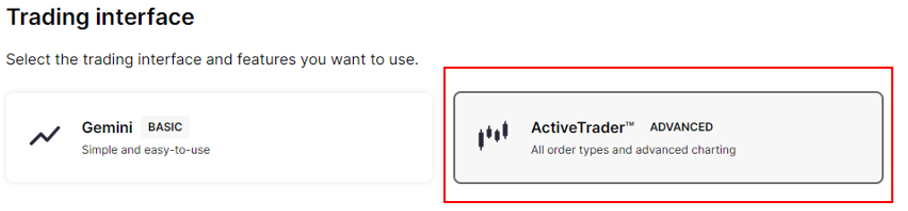
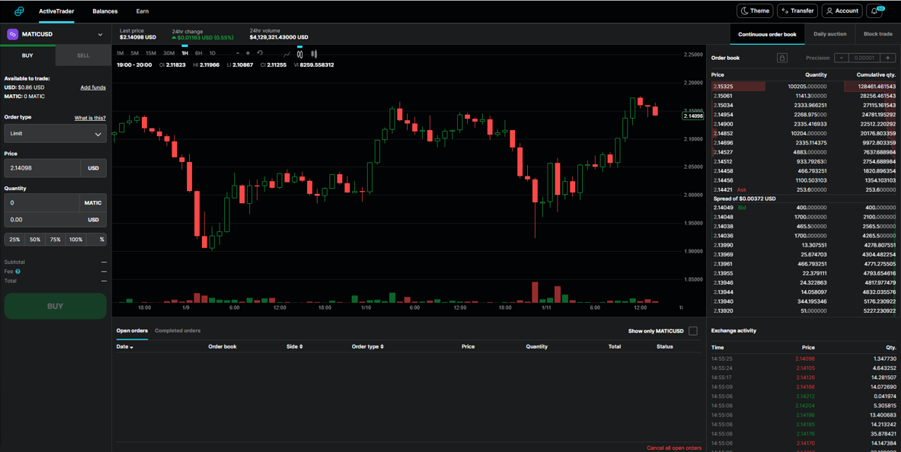
In a few minutes, your tokens will be on Metamask. Using Gemini, I recommend buying your favorite coins using ActiveTrader as the fees are lower.
For trades below US$500,000, it is 0.35% for a market order (taker) and 0.25% for a limit order (maker). Simply go to Settings > Account and activate ActiveTrader.
However, while sending ETH is straightforward, this is not the case for the rest of the coins, and this is where Kucoin and Crypto.com come in.
You see, different tokens are available on different networks much like how trains cannot travel on the highway and cars cannot travel on train tracks.
Step-by-step on-ramp guide (Example using crypto.com)
For MATIC
Step 1: Buy MATIC on Gemini with ActiveTrader
Step 2: Send MATIC to Crypto.com
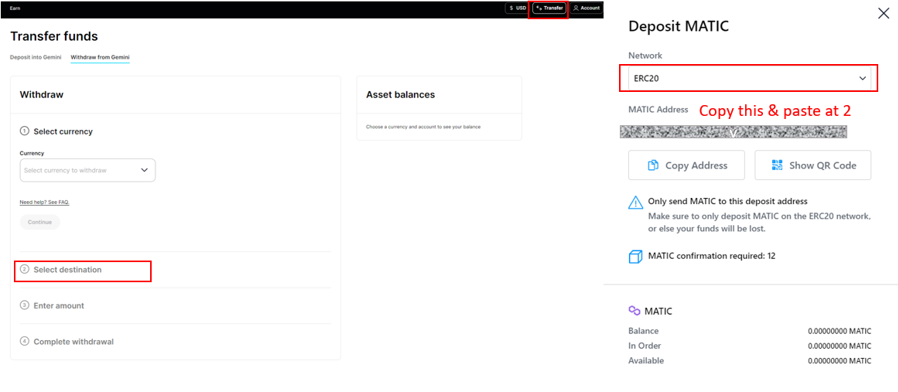
When withdrawing to Crypto.com, make sure to copy the ERC20 address of MATIC. On Crypto.com, Balances > MATIC > Deposit.
Use the address under the ERC20 network. This is important as that is the network Gemini uses.
Step 3: Withdraw MATIC from Crypto.com to MetaMask
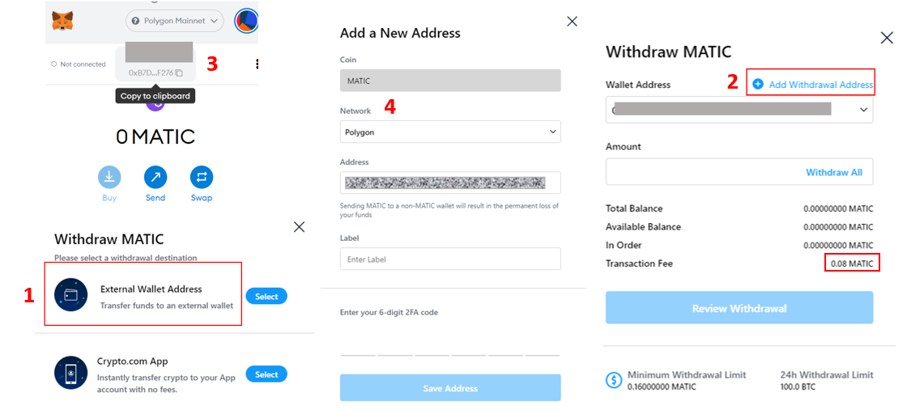
Once the MATIC has been transferred, go to balances but choose “Withdraw” this time. Click on that and choose “External Wallet Address”.
You will then have to “Add Withdrawal Address”. At this point, make sure to paste in your MetaMask address from the Polygon mainnet.
The label is for your own reference and can be named anything. You know you are transferring to the MATIC network when the transaction fee is 0.08 MATIC.
Step-by-step on-ramp guide (using KuCoin)
For BNB
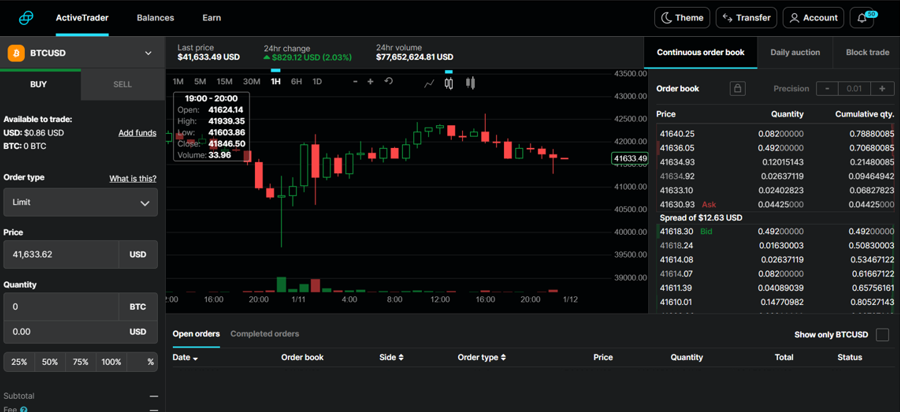
Step 1: As we are unable to buy BNB directly on Gemini, we can start by buying BTC using ActiveTrader
Step 2: Withdraw BTC to KuCoin using Bitcoin network
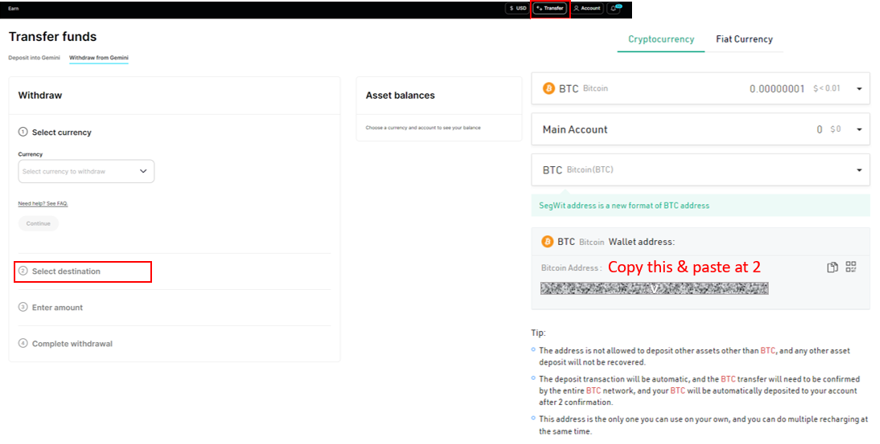
Go to KuCoin and there, you will be able to find the BTC address by clicking on “Deposit” and choosing BTC. There is only one address. Paste that in Gemini
Step 3: Swap for BNB on KuCoin
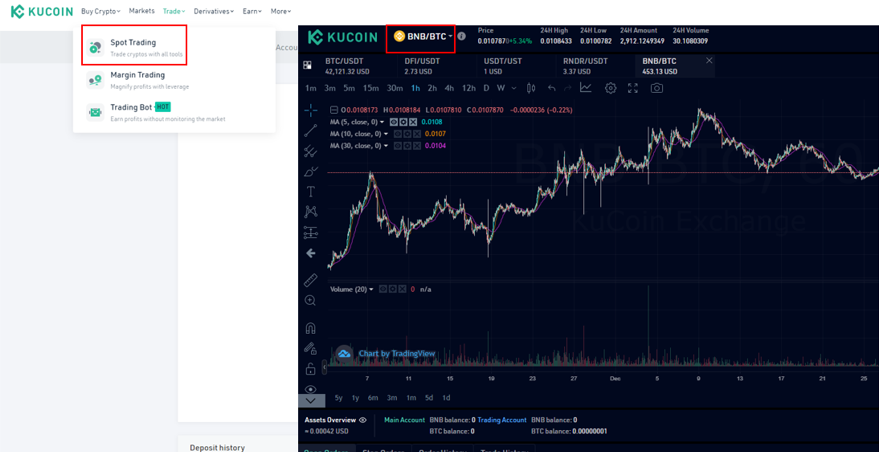
Once your BTC has been deposited. Go to Trade > Spot Trading. There, choose the BNB/BTC pair. You will want to SELL BTC for BNB. I recommend using market order as it is faster, and fees are the same (0.1%)
Step 4: Withdraw BNB from KuCoin to MetaMask using BEP20 network

Copy the BSC address from your MetaMask wallet and paste it into KuCoin. Remember to choose BSC (Binance Smart Chain BEP20) for the network.
Remarks are not necessary if sending to your own MetaMask account.
Exceptions
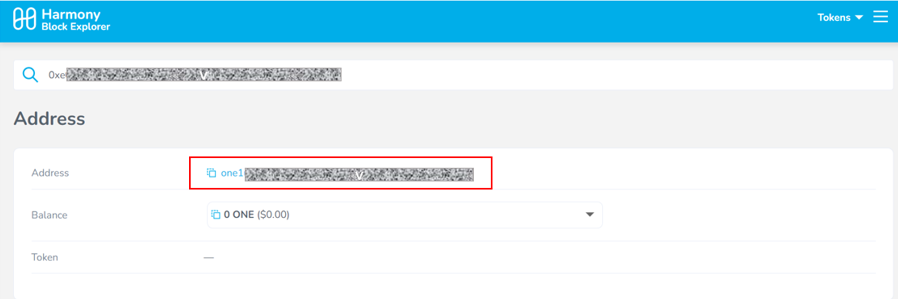
While most addresses can be copied directly from the MetaMask wallet and pasted into the withdrawal form of a CEX, it is slightly different for Harmony.
For Harmony, you would need to paste the address you copied from MetaMask here first. You will then paste the address starting with one1 into Kucoin or Crypto.com to withdraw via the Harmony network
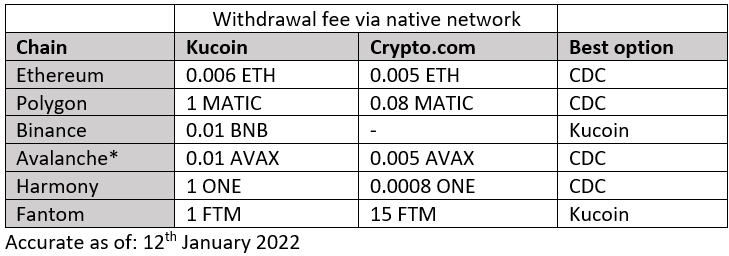
Summary of fees
Conclusion
The on-ramp process is tough to implement due to the different networks of each chain. But I believe that this could get drastically easier as DeFi gains mass-market adoption.
Also Read: How To Create A Terra Station Wallet And Send Native $LUNA Tokens From Crypto.com, Gemini